 |
|
|
 |
|
|
Not a member? Join Today to see why so many say they are Proud to be a Venturer!
|
|
| 1st Gen Venture Valve Adjustment Procedure |
|
Author: Nacho Views: 43481 Votes: 45 |
|
Hi there, gang. I am still going on with my Winter Protect in Summer LOL!!! I'm about to reach the inflexion point, where I will start building the bike back instead of tearing it down. My last main job to do was to check the valves clearance. It really wasn't scheduled yet, but as long as I had to change the cylinder head cover gaskets because they were letting some "grease" find its way out of the engine, I thought it was time to do the valves checking knowing I was gonna have to open the covers. This was the first time I attempted to do this kind of job, so I was really scared about it, but following the manual, reading some posts here on the forum and some other V-max forums in Spain, as well as many many phone calls to my friend Antonio, in Seville, Spain, I decided I could do it myself. So, here is step by step everything I did with "some" pics I took during the process. I hope they can help somebody in the future. This is a short list of the tools you'll need:
Opening the cylinder covers is pretty easy. There are 8 bolts with a rubber grommet in each one. They are not very tight, so you can loosen them easily with a 10 mm wrench without applying too much strength. Each bolt has one rubber grommet, don't loose them. You can reuse some of them if they are OK, but as long as my bike is almost 20 years old, I decided to change them all no matter how good or bad they were. RickH provided me the needed 16 grommets and the cover gaskets at a very good price. In my bike, the carbs were apart from the bike, so taking the covers off was real easy. But if you dig in the forum, you will find members who have taken them off without taking the carbs apart. Some of them even did it in a parking lot during a trip. Personally, I don't thing this is a job to be done in a parking lot. If something goes wrong you are in trouble with an open engine and not able to move the bike. You better do it at home were you can leave the bike safely stored if you need it, or simply go to see that baseball match on TV and come back later. Anyway. Carbs out, covers out. This is what it will look like: Front cylinders viewed from the right: 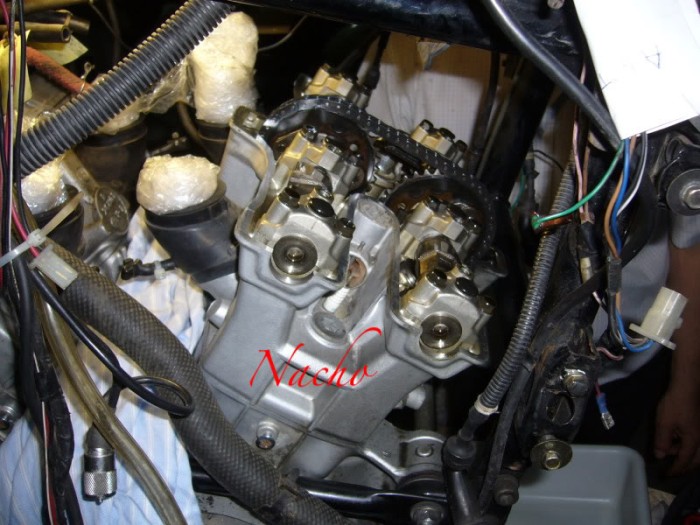 Rear right view:
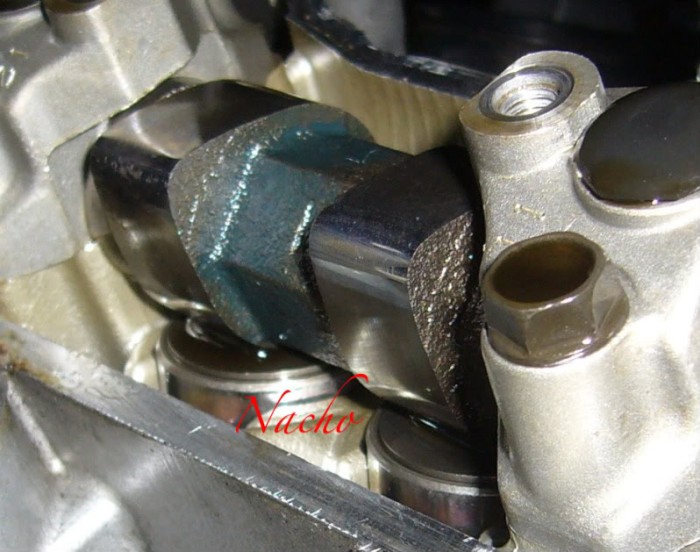
TAC Note: Notice the black rubber plugs in the top of the cam bearing caps. These are oil plugs that just push into the caps and are held in place by the cam covers. Be sure the plugs stay in place before reinstalling the cam covers to avoid loss of oil pressure. They have been known to occasionally fall out when removing the cam covers. 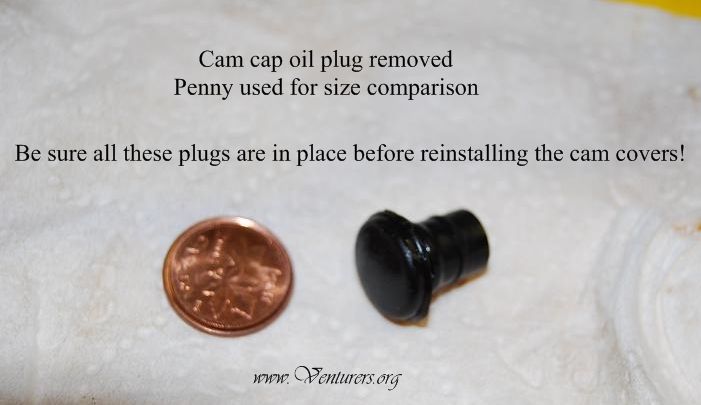 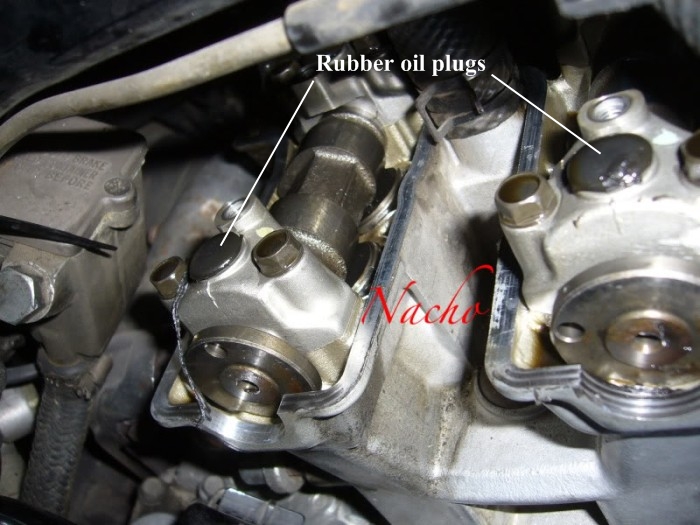 And for those who like my pictures and the zooms I do, here are some closer looks of the camshafts, valve shims and valve shim buckets:
 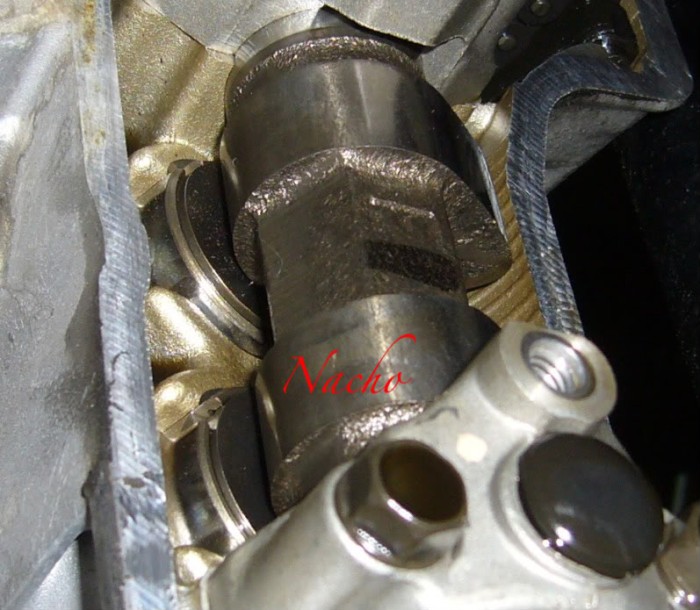 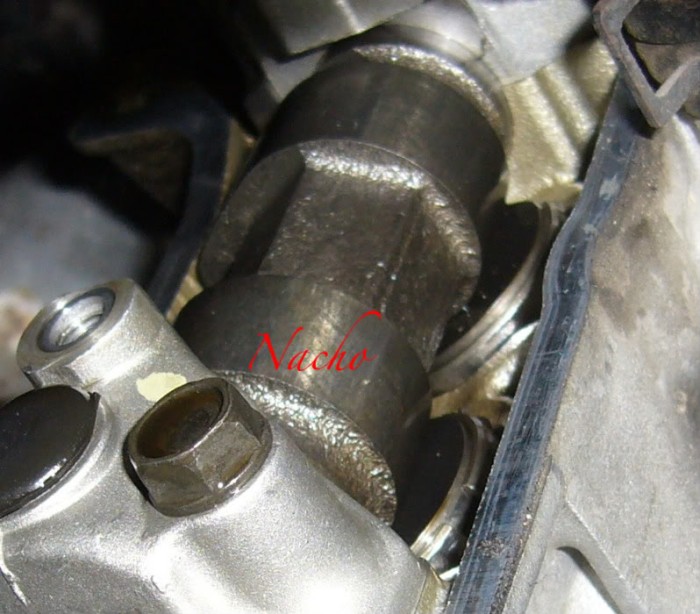 OK. Next step was to check the clearance between the valve shims and the camshafts. In order to do such a thing, you will need a feeler gauge. The gauge sheets have to be inserted between the camshaft and the shims right when the lobes are turned away from each other. To get to that position, you will need to open the stator small cover plate and the little window ahead of it (used for timing checking also). With the little window open, we want now to turn the crankshaft (ALWAYS COUNTERCLOCKWISE) until we align the marks in the small window. This marks are a T1 and T2 mark and the procedure of the manual says to align the T1 position with the stationary pointer using a 32 mm socket wrench to rotate the crankshaft. At this point, I almost got crazy because there are actually two T1 marks and only one T2. And if you choose the wrong T1 mark you won't be able to read the clearance correctly. I contacted Neil McRobbie (Neil86) and he explained it to me. Here is his explanation:
I think there is a mistake in the manual in the valve clearance section, .....the two marks close together are for timing...(an allowable range between the two marks). As you rotate the crankshaft CCW (as it normally turns) the timing mark range will appear first in the window, then you will see the single mark for TDC of #1 cylinder. So I would think you should use the single mark, the main thing though is to make sure the cams are on their base circle...the ramp of the lobe has not started...as this will give an erroneous low clearance reading. If you look at the manual section on checking ignition timing, it shows the two different marks and the purpose.
The reason your bike has 2 sets for T1 but only 1 mark for T2 is probably because in 90 Yamaha changed the pickup coils...from 2 assemblies to 1...so only one timing mark is needed on the newer bike. Keep in mind, the timing isn't adjustable, but if the pickups were loose or got bent....the timing would be wrong...and the timing check would find that. And this is the labelled picture he sent me to explain it (thankyou so much, Neil):
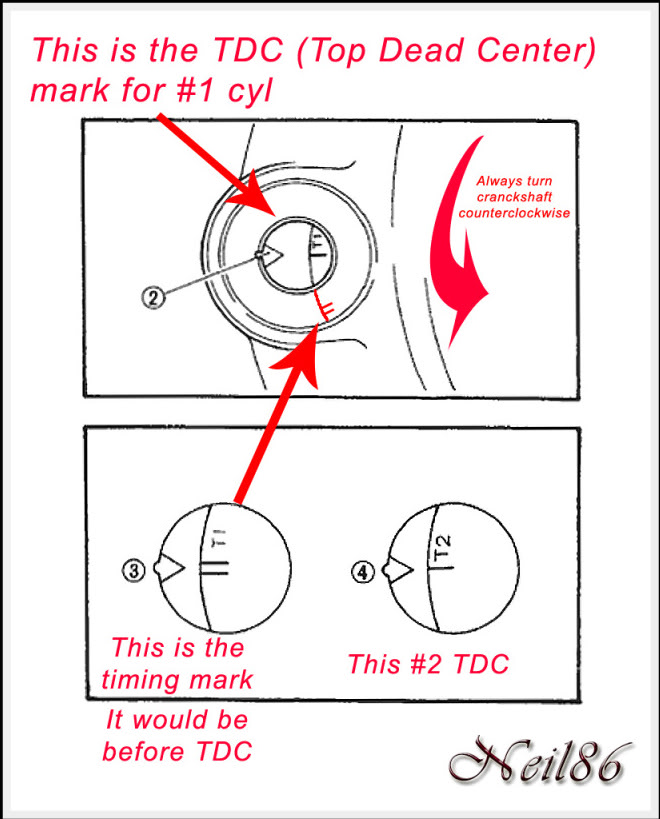 Once this is clear, let's keep on with the article: This pic shows the stator cover and the little window open. Next pic is just a zoom of the first one. All the dirtiness you see in the pic is gone now. Don't know when was the last time this cover was unbolted from the previous owner:
*Note that Yamaha recomends using a 32mm socket on the rotor hub to rotate the crankshaft. This is to avoid possibly loosening the rotor bolt.* 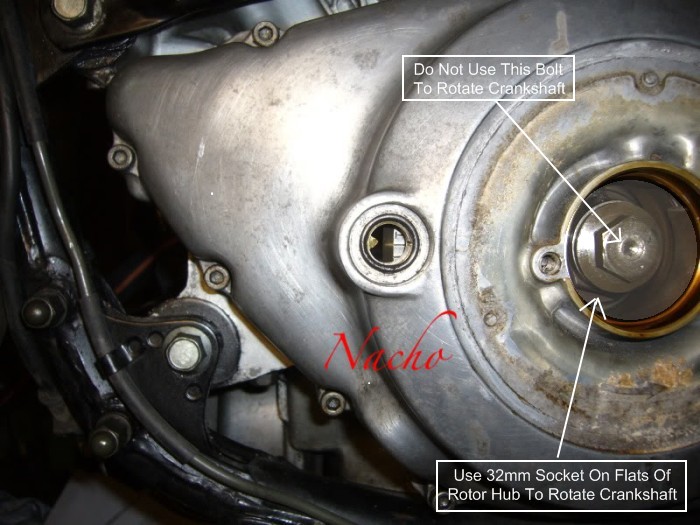 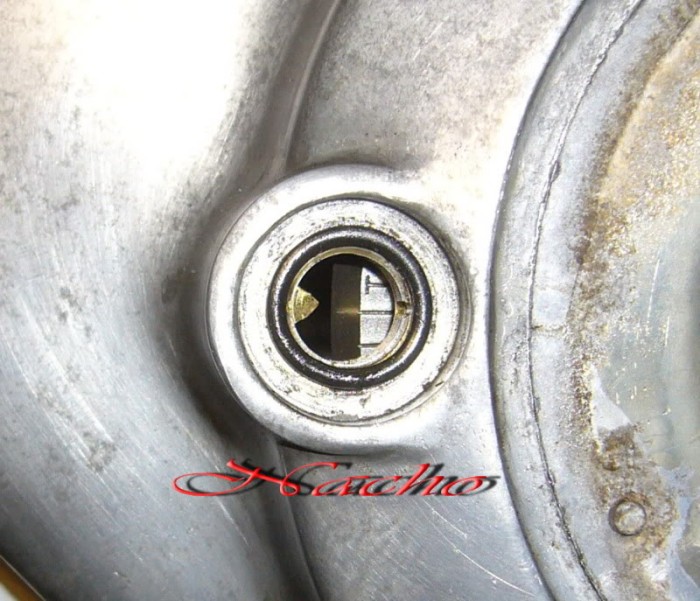 T1 mark allows you to check the valve clearance of cylinder number one (rear left as you seat on the bike). Insert the right feeler gauge between the the shim and the camshaft. The tolerances you need to find are 0.16~0.20 mm for the exhaust valves, which means you should be able to insert the 0.15 feeler gauge but not the 0.20 one. For the intake valves, the tolerances are 0.11~0.15 mm meaning you should be able to insert the 0.10 gauge but not the 0.15. To figure out which valves are intake or exhaust, just check and read the camshaft axles. You'll find the words EX and IN chiseled in the axles. Once you have checked the clearance of the shims, write down in a paper the value you got and if each valve is in or out of specification. Then proceed to the next cylinder, but before that, please let me show you a feeler gauge being used: 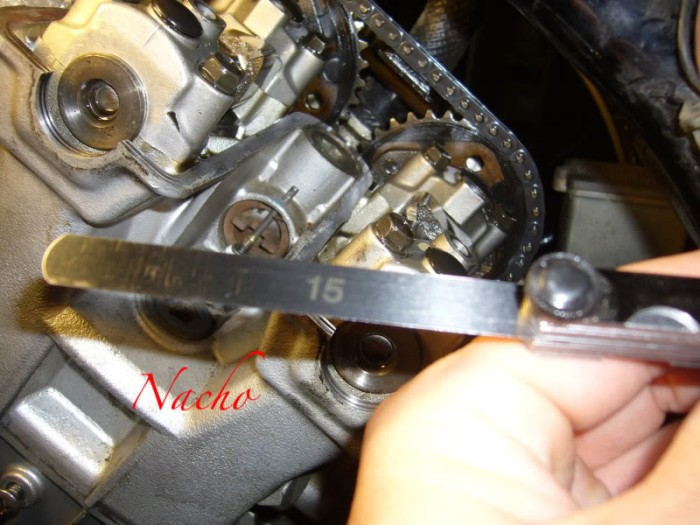 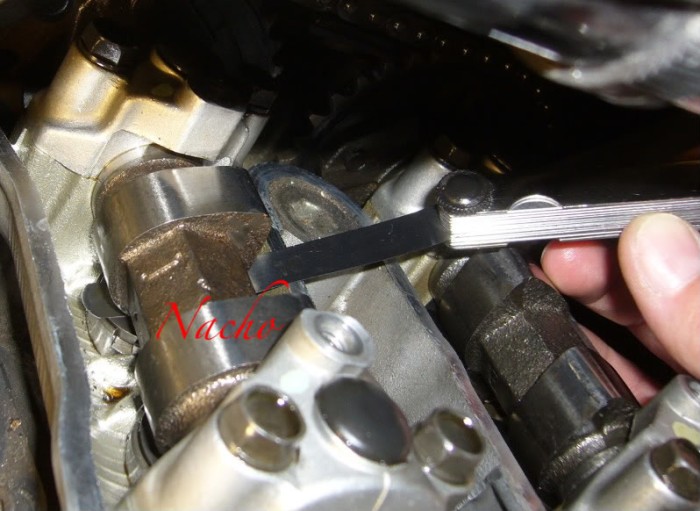 Next cylinder to be done should be #3 (rear right) and to find the right spot to use the feeler gauge you simply turn the crankshaft (counter clockwise) 180 degrees and start over again with the procedure in that cylinder. Use the feeler gauge and write down what valves are out of specification. For the other two cylinders, starting with #2 (front left) we need to find the T2 mark on the stator little window. Once the T2 is aligned with the stationary point, use the feeler gauge again and write down the findings (out of specification or not and by how much). For the last cylinder (#4, front right) simply turn the crankshaft 180 degrees again from the T2 position and do the measurements again. Now, if all your valves were all right, reverse the procedure and install back the covers with the new gaskets, bolts and grommets and you are done. If any of the valves needed adjusting keep on reading. There are two situations you can find if a valve needs adjusting. You might need thicker shims or thinner ones. In my case, I needed thicker ones, but before learning how to calculate the thickness of the new shims you need, let's see how you take the bad ones off their seats. In order to remove the shims, you will need a special tool designed specifically by Yamaha for this matter. This is the tool you need: 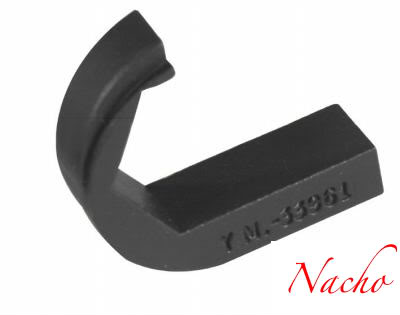 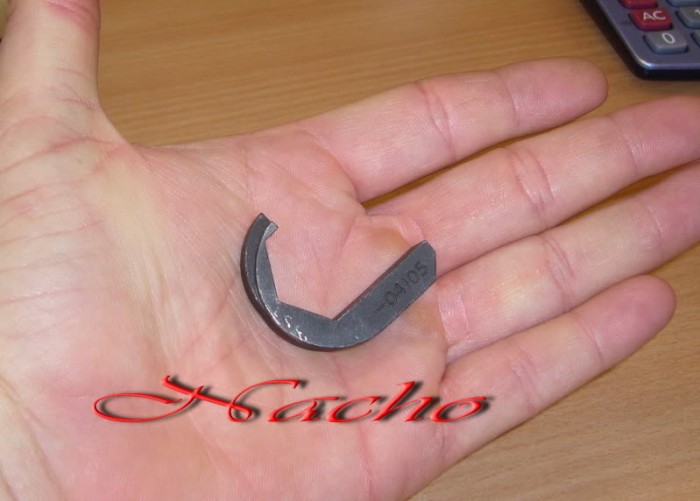 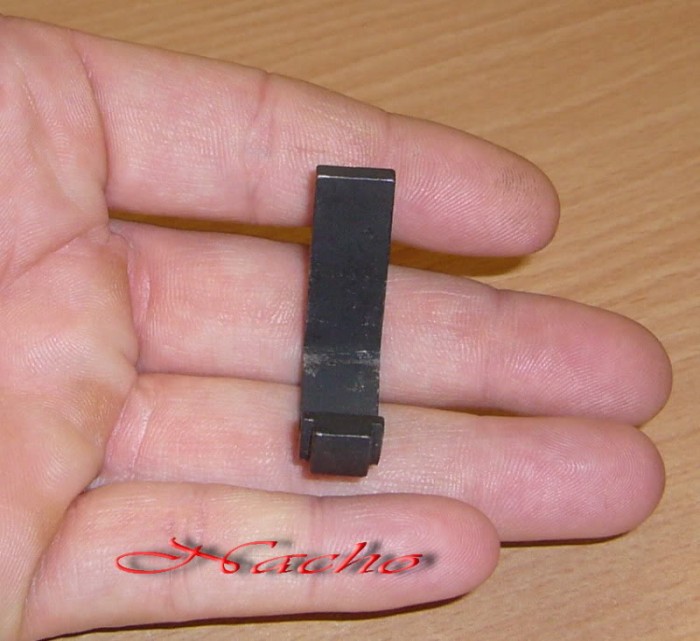 I found it on the Internet because the Yamaha dealers here in Spain refused to sell one to me. I found a company in Arizona called Motor-Services with an E-bay store and they sold me two of the for 70 bucks each (the other one was for a friend). This is the company web site: http://www.moto-services.net And this is their E-bay store: http://stores.ebay.com/Moto-Services Once the tools arrived, I proceeded to remove the two shims that were out of specification in my bike. Here is how I did it: First, place the tool on the camshaft axle like this. Make sure the tool is not gonna step on the shims, only on the seats or lifters. Also, make sure the longer part of the tool and the camshaft lobes are parallel to each other. 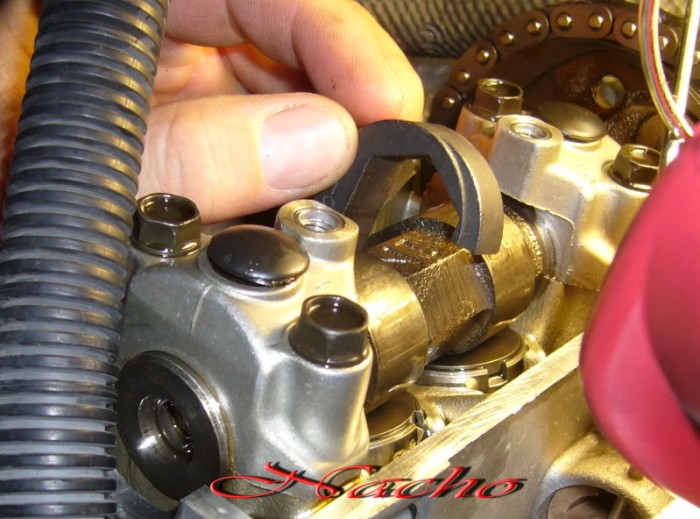 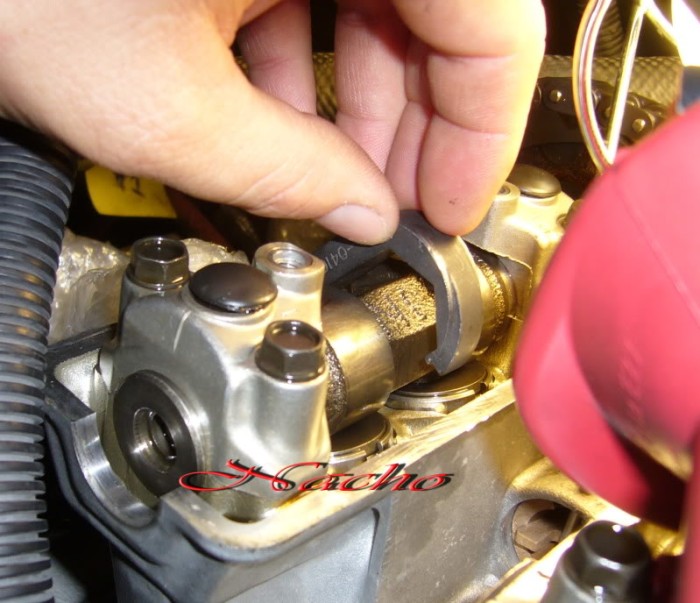 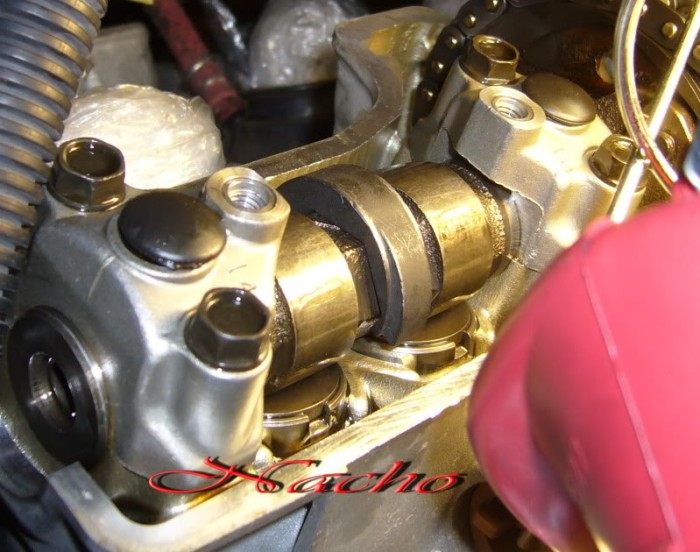 Slowly, turn the crankshaft as before in order to have the tool stepping onto the shims lifters. This is what we are trying to get: 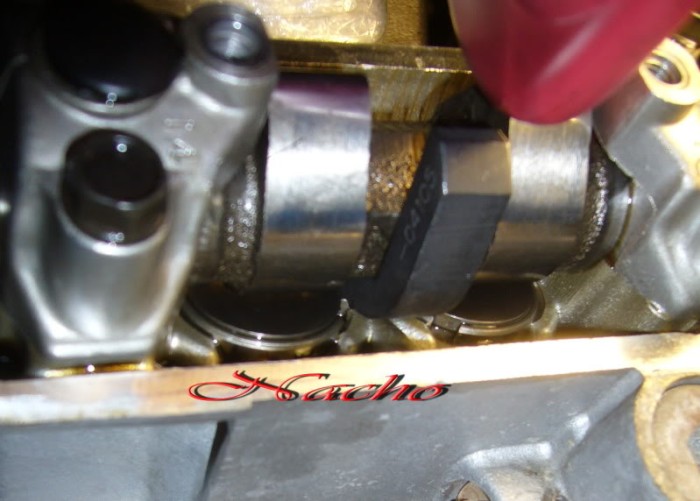 Now we have space enough to remove the shim, but it will for sure be stuck there, so gently, very gently, try to release the shim pushing and jiggling it a bit with a screwdriver from each side. When you feel it moves, use small pair of tweezers or a magnet (what I used) to extract it from there. Here is how I got it: 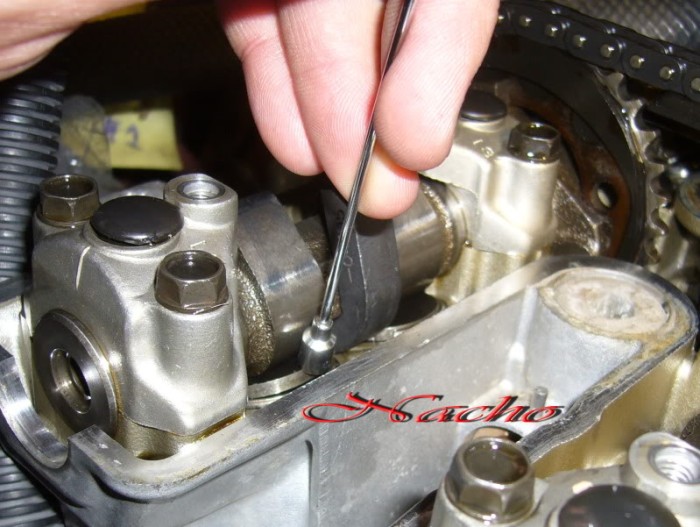 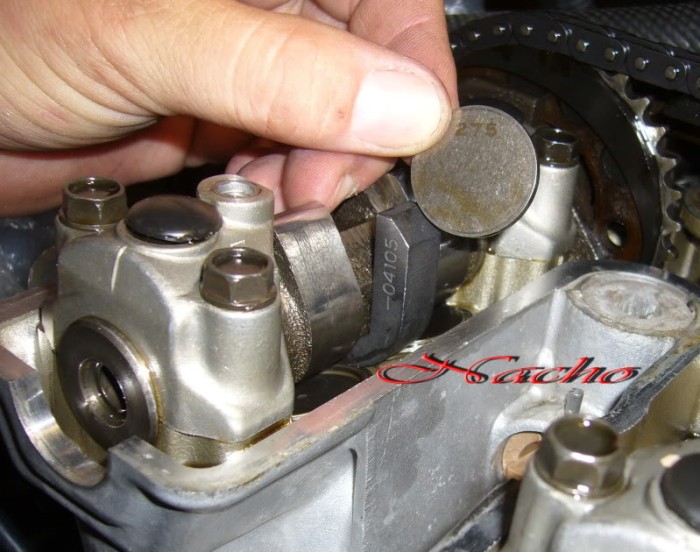 Once the shim is out, here is the difference of one lifter with shim and the other one without it: 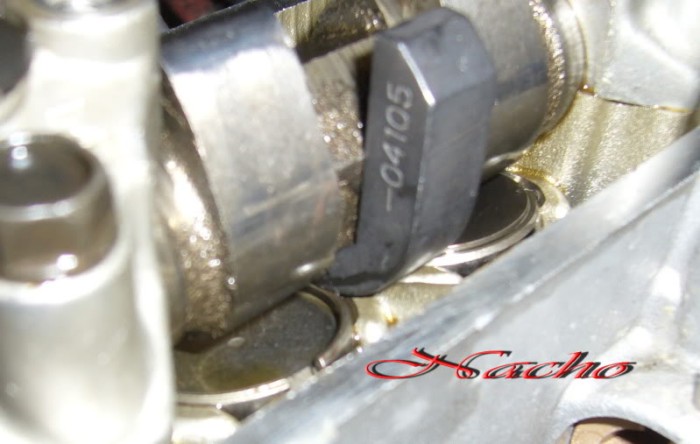 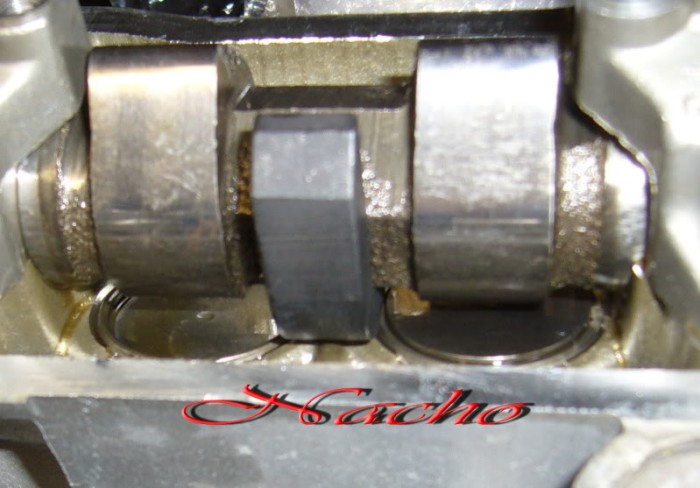 And here are the shims already out in my hand and compared to a 1 Euro coin (sorry I didn't have any US coin handy): 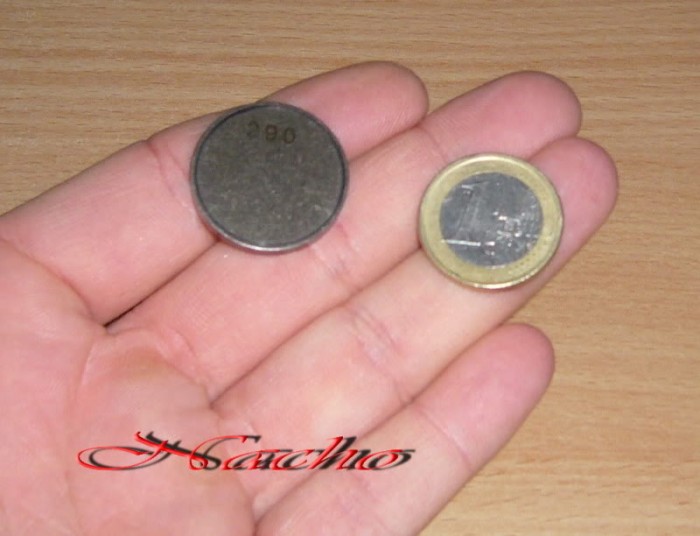 We are almost done. Last step is to replace the wrong shim with another one of the right thickness. To do such a thing, see the printed number of the one you have removed from the bike. With that number, go to the charts you will find in the workshop manual and cross the references till you find what you need. In my case, I removed two Intake shims, one being a 290 and the other one a 275. With these two thicknesses, I could not insert the 0.10 feeler gauge in either one but I could insert the 0.05 so that gave the horizontal line I had to use from the chart (0.06~0.10 mm). Then I crossed that line with the columns of the shims I removed from the bike and I got the new number I needed printed in my new shims (270 and 285. Of course the new ones were 0.05 mm thinner than the ones removed, as I could insert the 0.05 feeler gauge). TAC Note: It is most common for the valve clearances to get too tight as the mileage increases on the engine. This is due to the valve and valve seats wearing, which decreases the clearance between the cam and shim buckets. Just because you can't hear any valve noise does not necessarily mean the clearances are correct . Valves that are too tight can fail to seat properly and overheat resulting in a burned valve. Here is a chart with some red lines showing my particular case: 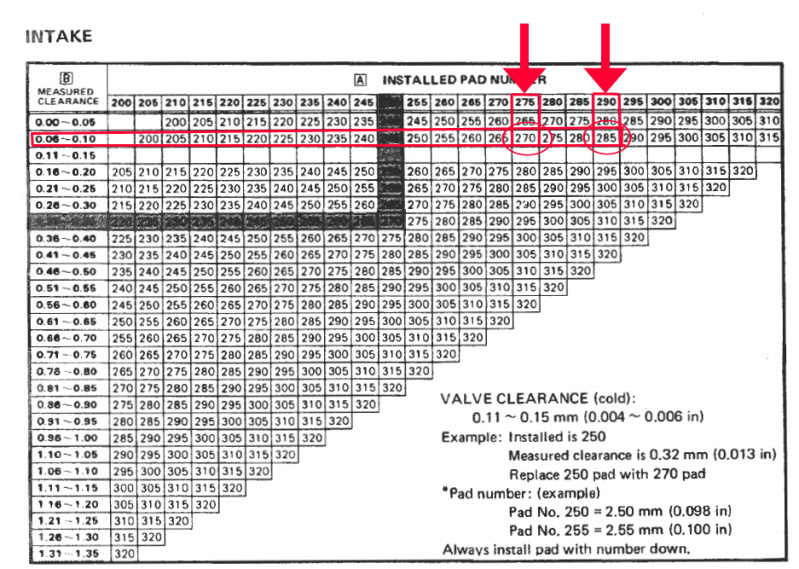 And here is the Exhaust chart so the article is complete: 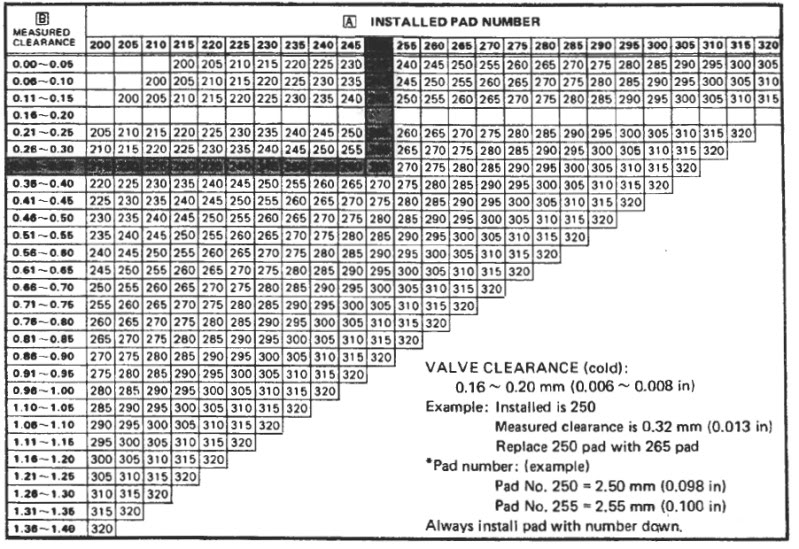 I checked all the local dealers in my town to order the shims, but they asked me from 10 euros up to 40 for each one (between 12 and 50 US Dollars), so I simply gave them a big smile and walked away. Came back to my office and did some research. All Ventures new and old use the same type of shims (25 mm diameter). Also many Hondas (CB 750, CB 900, CB1000, CBX six cylinders), also the old V-Max (I don't know about the new ones) and FJ 1100 and 1200 Yamahas. Some of the liquid cooling 3 cylinders Triumphs also use them. And guess what? Some old Toyota cars from the 80's also use these shims. I tried to go to the Toyota dealer in my town thinking that the car industry is always cheaper than the motorcycle one. Explained to them what I wanted, but they kept saying they had nothing for motorcycles. I insisted several times about wanting just some shims their cars use but the were too focused in my bike parked on the door. Gave them the same smile I gave to them the same smile I gave to the Yamaha stealers and went away. RickH is now sending me the ones I need for 9 bucks each. Still expensive under my humble point of view but at least cheaper then here. They are just pieces of metal, gosh! I did some more little research on the internet and found a nice company in Australia specialized in these types of shims. http://www.precisionshims.com.au/a/Precision-Shims-Australia They were a lot cheaper (about 3 USD each) and the guy sent me just two of each thickness from 265 up to 295. He was very nice, polite and very easy to deal with. I payed him 78 USD for 14 shims including shipping costs (about 4 bucks each). And he accepted Paypal. Wonderful. Now all I need to do is to get them here (Rick's or the Australina ones), hopefully this week and reverse all the process. By the way, when reinstalling the cylinder covers, make sure you check the arrows stamped in the inside of them. Those arrows HAVE TO POINT towards the Exhaust side. Here is a pic of the stamped arrow inside one of the covers: 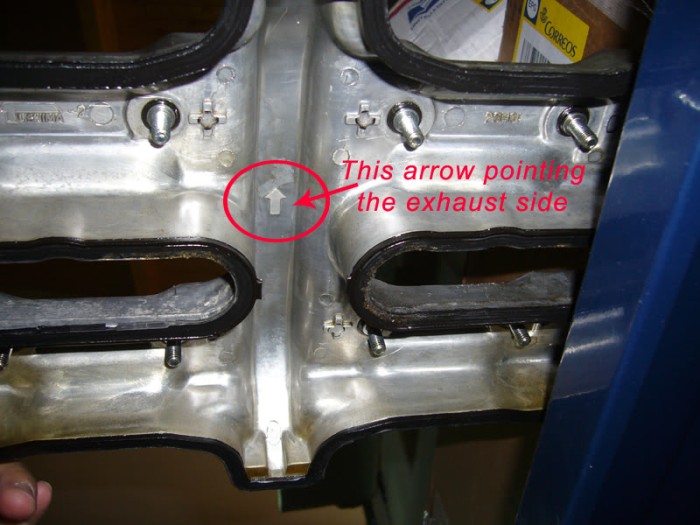 Also, IT IS VERY IMPORTANT TO INSTALL THE NEW SHIMS IN PLACE WITH THE PRINTED NUMBER FACING DOWN. Don't forget it!!! If anybody needs the part reference for all the shims, here is a little chart with all references for all thicknesses available (these are Yamaha references, of course) 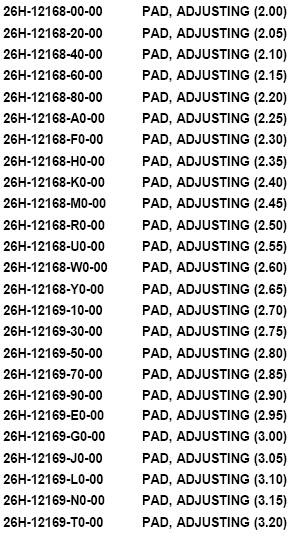 Anyway. I hope this "little story" can help anybody in the future. If I have made mistakes, I beg the experts to correct me so we can re-write the article and nobody gets confused. Thanks in advance for your attention.
Hasta la vista from Spain, Nacho. The Venturers MC #1691 member.
Last update: 09:07 PM Tuesday, December 4, 2012 |
| All material on webpages under the domain venturers.org, is the property of The Venturers, Inc. These materials are protected by copyright and other intellectual property laws. You may not reproduce or retransmit the materials, in whole or in part, in any manner, without the prior written consent of The Venturers, Inc. The free information contained herein is offered in the spirit of helping others and any action or advice taken from these pages is the sole responsibility of the receiver. |