 |
|
|
 |
|
|
Not a member? Join Today to see why so many say they are Proud to be a Venturer!
|
|
| Adding Grease Zerks to Early 1st Gen Ventures |
|
Author: Courtesy of MTA & Fred Vogt Views: 9498 Votes: 3 |
|
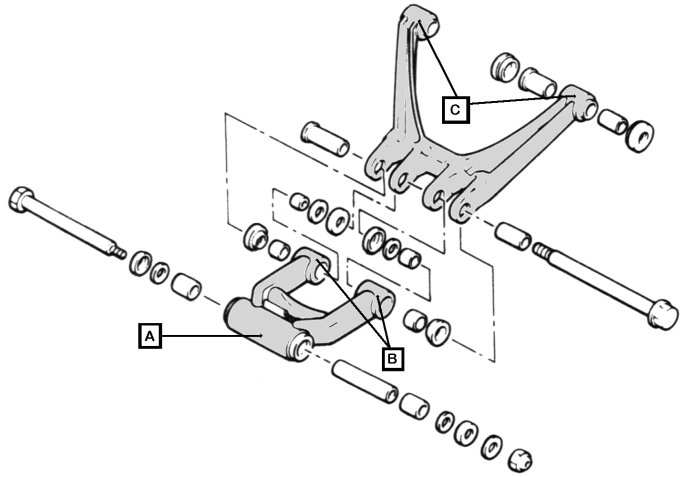
Zerk fittings This article appeared In September l988 Issue of Venture road on page 15 and In 1991 Yamaha installed grease fittings as standard equipment. There has been a lot of talk about installing zero fittings on the mono shock assembly and I have heard that at least one Priority Network dealer is doing just that. I decided to start with a set of arms off the wrecked '83 I have in the garage. Although this bike only had 14,000 miles on it, I could see some wear or pitting on all the metal surfaces and after some thought, I set off for the local auto parts store to purchase a 1/4-28 tap, a 7/32" drill, 2 long zerk fittings (11/16" overall) and 3 short ones (9/16" overall). The bill was $5.35 for the lot and as I drove home I could have kicked myself for waiting so long. Procedure... With the bike on the center stand, remove both mufflers and place a board under the rear tire to take the load off the assembly. Then remove the four bolts and the two bearings at the bottom of the mono shock. (Note: There are dust caps on each side of these bearings and they are not all the same, so make a note on where they came from). After you remove and clean both arms, you are ready to get started. I took my time with the first hole between the bushings marked "A", starting with a 1/16" drill, then a 7/32" drill and keeping the tap straight, I tapped the hole and installed one of the short zerks. The bushings marked "B" were not as simple because the '83 Venture has a metal bushing about .030" thick and I felt that the zerk was too long to go straight into the arm, so I used part of the weld to gain a little thickness but a thin washer would also have done the trick. Remember to drill the holes as close to the center as possible so the drill goes through the groove in the center of the bushings. (Note: 1984-87 Ventures have the thicker fiber bushing in the "B" position, so you only need to drill and tap through the one side of the bushing so that the zerk extends a little into the fiber to hold the bushing in place). The last two bushings marked "C" are drilled and tapped through the raised portion and then counter sink the holes with a clearance drill deep enough so the zerk extends into the fiber bashing. After you thoroughly clean the bearing surfaces, re-install the arms back in the bike and use enough grease to insure an even coating. Wipe off the excess grease. Now each time you change oil, give each of the fittings a little shot of grease for a smooth ride. On later models the procedure is the same and on the "C" bushings you will notice a flat spot where it looks like a grease fitting could go. 
Article courtesy of MTA and Fred Vogt
Last update: 12:13 AM Thursday, December 15, 2011 |
| All material on webpages under the domain venturers.org, is the property of The Venturers, Inc. These materials are protected by copyright and other intellectual property laws. You may not reproduce or retransmit the materials, in whole or in part, in any manner, without the prior written consent of The Venturers, Inc. The free information contained herein is offered in the spirit of helping others and any action or advice taken from these pages is the sole responsibility of the receiver. |