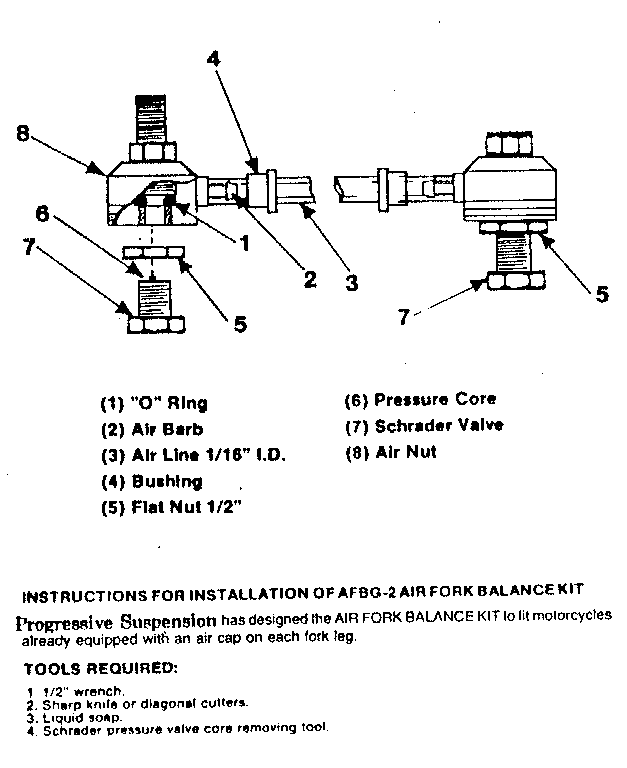
Fork Air Balance Kit
For easy installation, follow these steps in sequence:
- Place motorcycle on center stand.
- Remove protective caps from the air valves and depressureize both legs before attempting to remove the Schrader valve cores.
- Using a Schrader valve tool, remove both pressure valve cores from the inside of the fork cap air valves. This MUST be BEFORE attaching AFB air nuts. Air flow must be allowed to move freely in and out of fork legs in order to achieve a true balance between fork tubes.
- Install the flat nuts onto the air cap stem, with the sharp corners facing upward. When tightened against the air nut, these sharp corners will provide a good locking grip. Before placing the Air Nuts onto the Air Stem, install the Rings into both air nuts. Make sure they are well seated in the ring grooves. A drop of liquid soap rubbed on the Ring will make installation easier.
- Take one of the air nuts, (it is suggested that the air nut with gauge be installed first to allow for easy air line installing) and push air line onto the plastic air barb. DO NOT LUBRICATE THE END of the plastic air line or the air barb.
- Next, slide one of the plastic bushings on the other end of the plastic air line with the small end facing the air nut.
- Using a small drop of liquid soap, lubricate the exterior of the air line over the plastic air barb. Slide the bushing over the plastic line and the air barb making a tight and non-leak fitting.
- Screw the air nut onto one of the air fork valves. Continue to screw unit until resistance is felt. That will be the Ring coming in contact with the top of the air valve. Continue to turn until the air barb is pointing toward the other fork leg or a convenient routing for the air line. DO NOT TIGHTEN MORE THAN TWO COMPLETE TURNS AFTER FIRST RESISTANCE IS FELT. NOTE:
When installing a gauge unit, you will notice that the air barb is positioned to allow the gauge to be used on either the right or left leg. Always align the gauge so that it can be view from the saddle conveniently.
- Now install the other air nut on the opposite fork leg and tighten the flat nut locking the air nut into position.
- Slide the plastic bushings onto the air line and route the air line to the second air nut making sure there will be no kinks or the air line will not be pinched when the forks are moved lock to lock.
- Using a sharp blade, cut the air line to desired length.
- Repeat items No. 6 and No. 7.
- Inflate air forks using factory handbook specifications as your guide.
- If air leaks are encountered, check all joints with a soap and water solution, watching for air bubbles. Tighten loose connections.
CAUTION... NEVER EXCEED FACTORY AIR PRESSURE RECOMMENDATIONS AS DAMAGE TO FORK COMPONENTS MAY RESULT. REMEMBER AIR PRESSURE IS USED TO GIVE ADJUSTABILITY TO FORKS AND SHOULD NOT BE THE ONLY METHOD OF SUSPENSION. DO NOT REMOVE FORK SPRINGS.

Last update: 06:12 PM Sunday, September 26, 2004
|

